
Clea Aumont
June 15, 2026
Building Dash Apps with AI Coding Agents
AI coding assistants and autonomous agents are fundamentally shifting how data applications are built. By leveraging Dash's declarative, component-based architecture, these tools can generate interactive dashboards from simple natural-language prompts. This tutorial explores how to optimize your development environment and strategy to build high-quality Dash applications using the latest agentic workflows.
The Agentic Development Workflow
Unlike traditional autocompletion, AI agents can browse documentation, manage file structures, and execute tool calls to validate their logic. For Dash developers, this means faster iteration from a conceptual idea to a polished production application.
Connecting to the Dash MCP Server
The Model Context Protocol (MCP) provides a standardized way for AI assistants to communicate with external tools and data. Plotly developed an MCP server for Dash documentation, allowing agents (like Cursor, Windsurf, or Claude Desktop etc.) to seamlessly search and read the entire Dash documentation.
- Accuracy: Agents pull directly from up-to-date documentation, significantly reducing hallucinations.
- Context: By exposing tools like list_pages and get_page_as_markdown, the AI understands the specifications for various components and charts.
Configuring Your Workspace
To get the most out of your coding agent, you should establish strict guardrails and provide high-level context upfront.
The AGENTS.md File
One of the most effective strategies is including an agents.md file in your project root. This file acts as a system prompt, defining your architecture, tech stack and project preferences so the agent aligns with your standards from the start. Here we have provided a sample agents.md file you can copy-paste directly into your codebase, but make sure you only keep what aligns with your app’s vision.
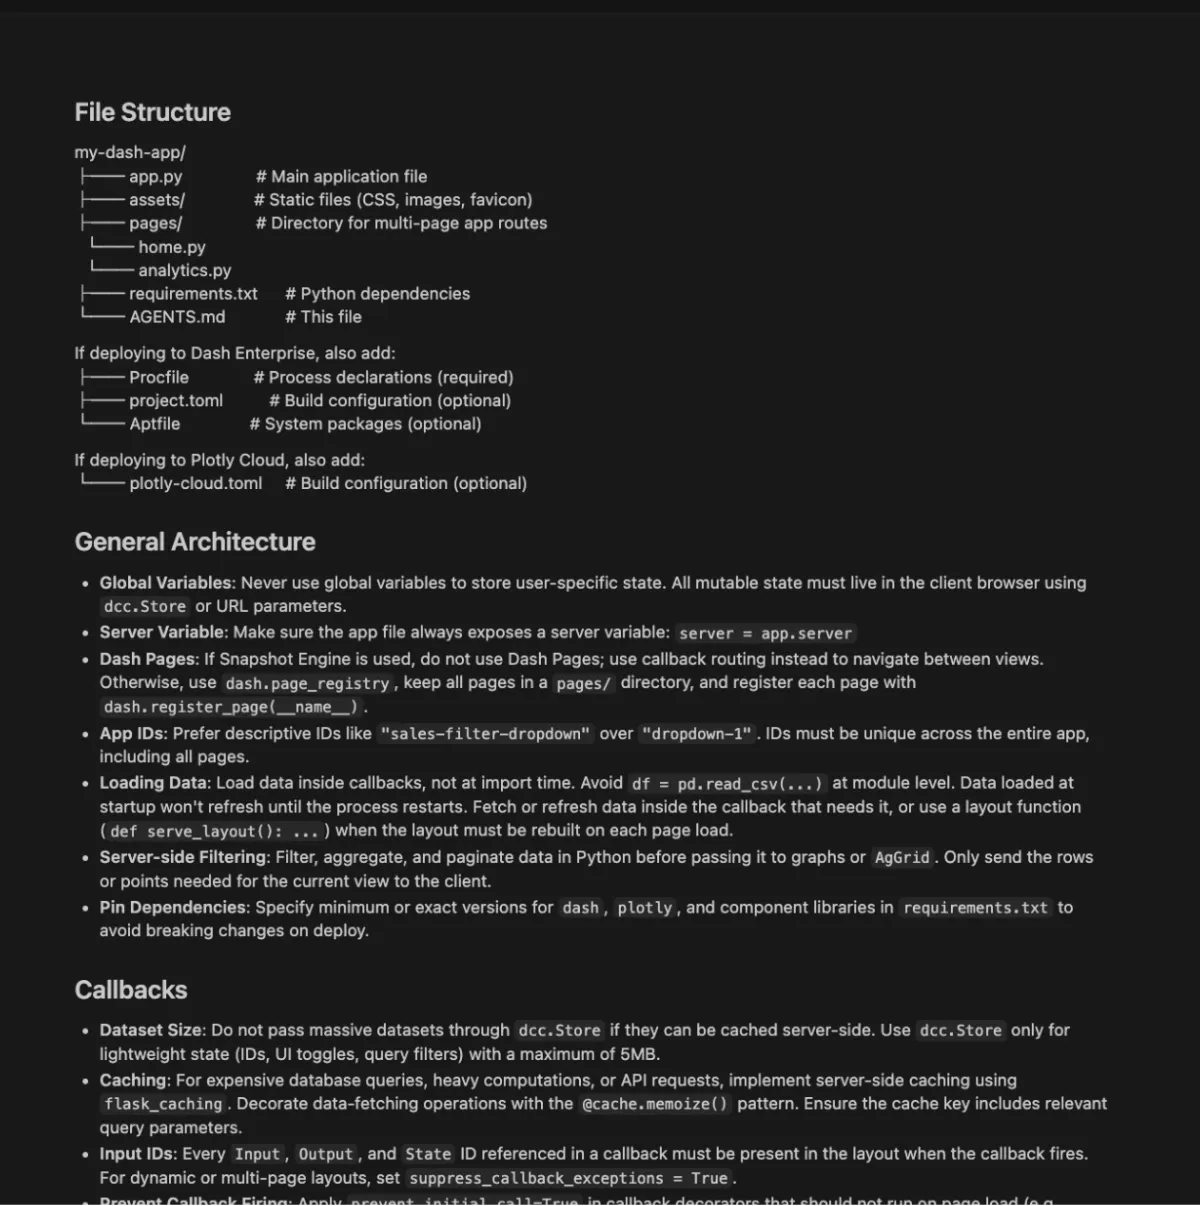
Recommended AGENTS.md Standards
- Library Priority: Explicitly list your preferred component libraries such as Enterprise Dash Design Kit (DDK), Dash Mantine Components (DMC), Dash Core Components (DCC), or Dash Bootstrap Components (DBC), and many others, and specify the ones you would like it to avoid.
- Enterprise Access: Ensure the MCP server is connected if using enterprise-only features, as standard LLMs may lack access to that documentation.
- Component Specifications: Define requirements for complex components like Dash AG Grid, including preferred themes, pagination, and filtering behaviors.
- Performance & Data Handling: Provide guidance on caching strategies based on your data volume and highlight your expected file architecture.
- Data & Dependencies: Include a sample data structure and a requirements.txt file to ensure the agent uses the correct environment.
Agent-Led Development Example
- Now that you have saved the agents.md file to your project, it's time to use natural language to interact with the agent and build out a Dash application. Here, we recommend breaking down the app building process into three steps. Each step will have a few recommended prompts, provided below.
- Step 1: Create the application shell and layout
- Step 2: Add in data connections and application interactivity
- Step 3: Fix overall theme, styling and colors
Step 1: Creating your app layout
Start with your app directory, in this case we will call it ‘sales-dashboard’. In this directory, make sure you have a requirements.txt with up to date versions of at least Plotly & Dash, your agents.md file, and your dataset, or a sample of your data if you are connecting to an external database. Start with a high-level prompt to define the overall structure and layout of the dashboard. Keep in mind that the agent will have context from the agents.md file and will know how to structure the application and where to place each part of the code. Here is an example of such a prompt.
Build a sales dashboard using the @sales-dashboard/data.csv. Reference the Dash Documentation via MCP and use the @sales-dashboard/agents.md file for guidelines. First, construct a two-page layout (Home and Analytics) with a sidebar for filters on the left-hand side. Do not include callbacks or data processing yet.

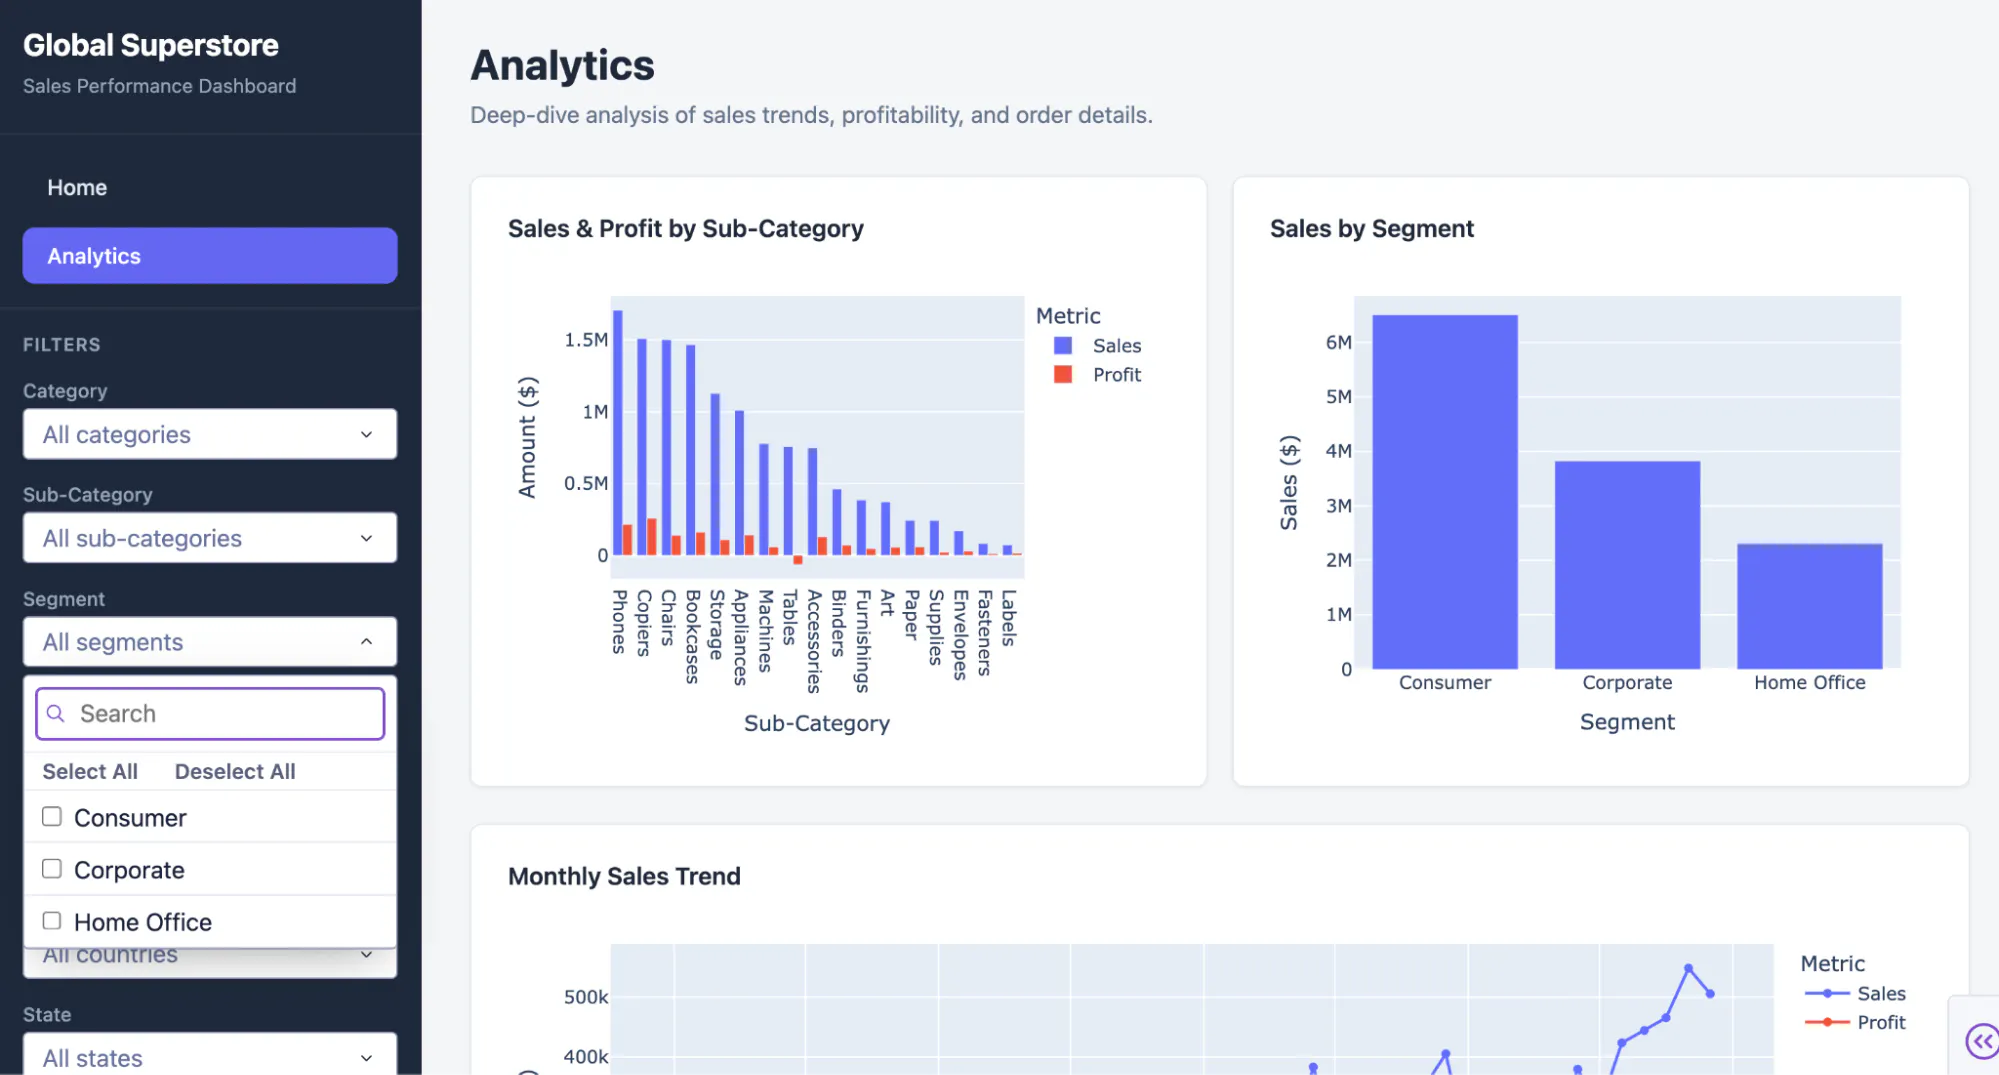
This is what only one prompt was able to generate with the help of the docs MCP as well as the agents.md file. Now that the basic outline is generated, refine the layout by narrowing the focus and removing unnecessary components. LLMs will have a tendency to overcomplicate and over-engineer codebases. It is harder to remove components and charts when they are fully integrated and connected to data, which is why this first step is important. Here is another example prompt to refine the app layout:
Remove the following filters: "Order Priority", "Ship Mode", "Order Date Range". Ensure the active tab is highlighted. Add a world map chart. Remove the "Profit Margin by Ship Mode" and "Top Customers" charts.
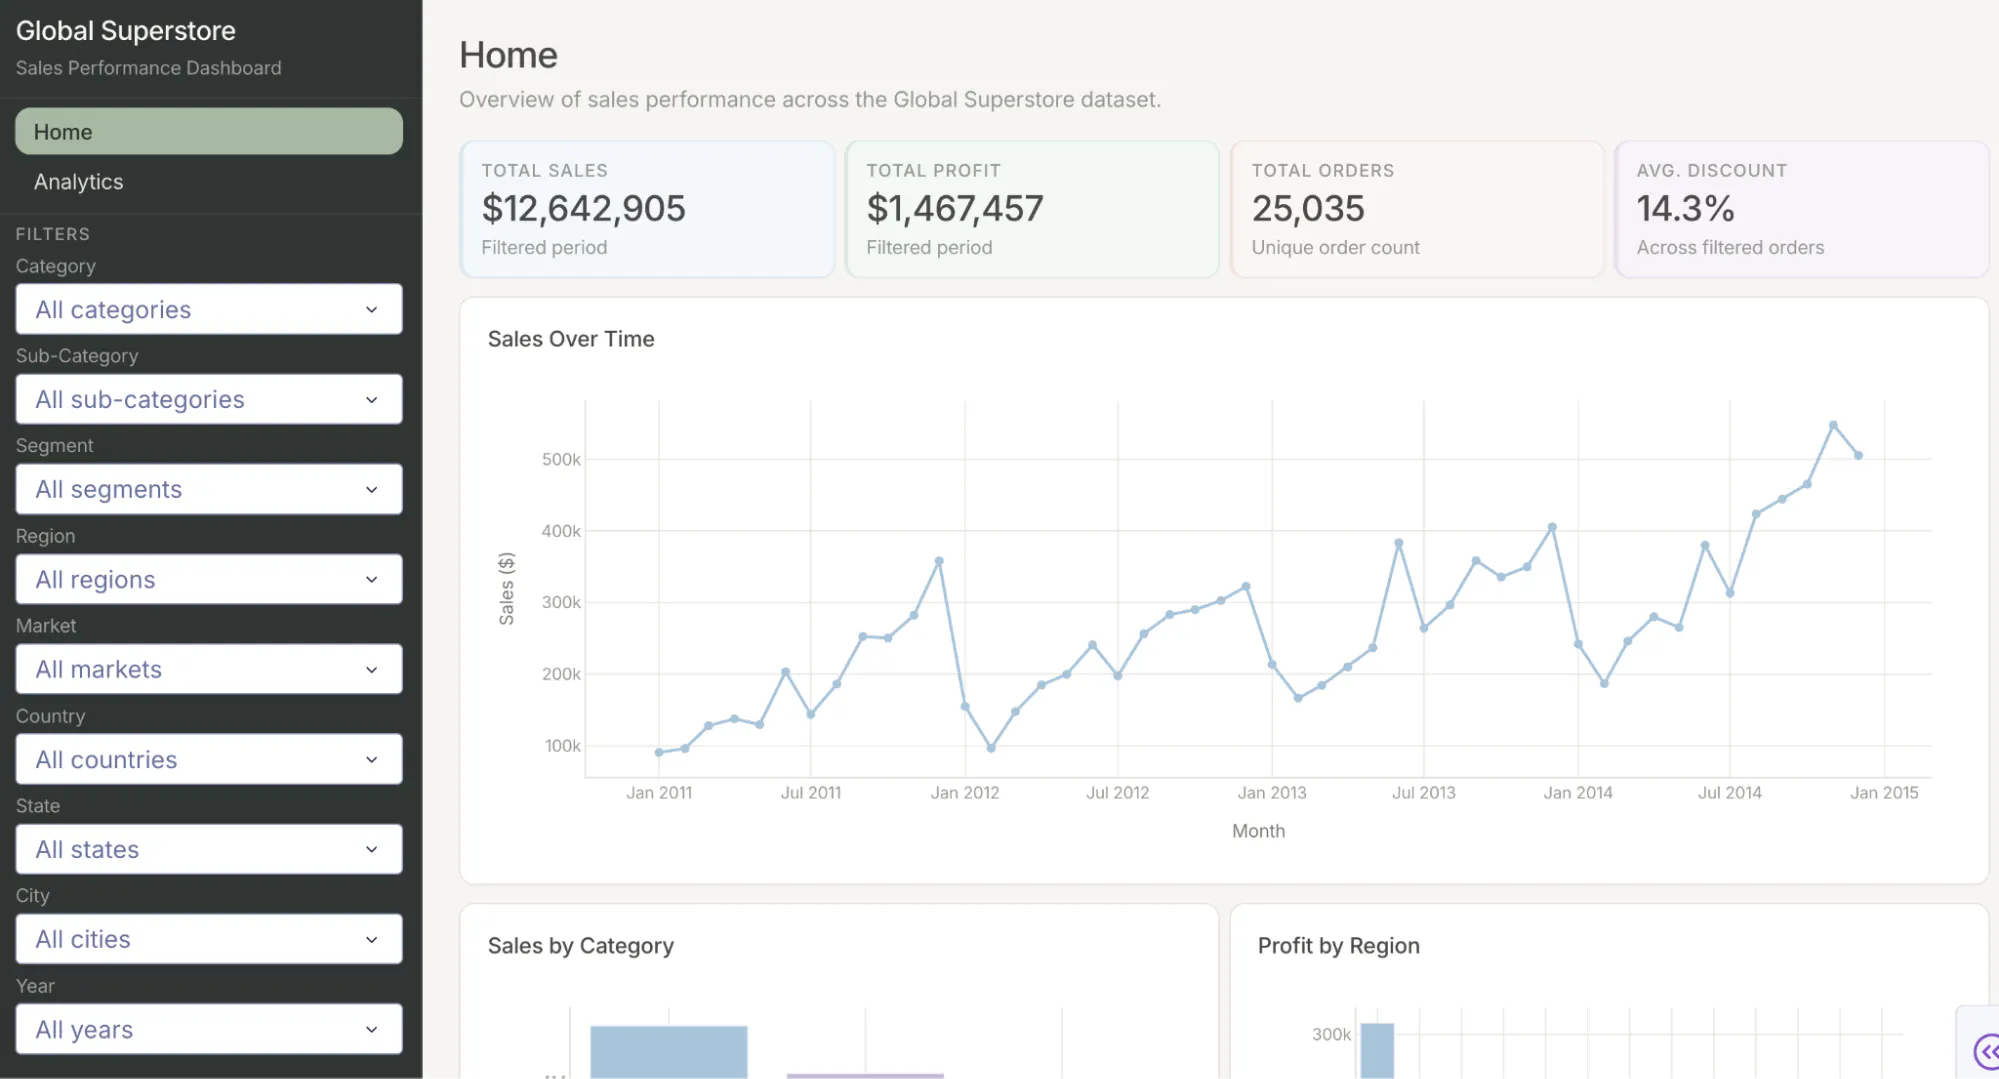
We now have all the visuals we actually need to see and useful filters. We can move on to step two.
Step 2: Data Connection and Interactivity
With a solid layout in place, the agent can then be instructed to bind the data source to the components and charts and implement the necessary callback logic to add interactivity. This prompt was enough to hook up all of the datasets to the charts.
Add the data to the charts and link them to the filters using callbacks. This is a small dataset so do not use caching.
This simple prompt was able to connect all of the charts to the dataset and filtering interactivity.
This would be a good time to tweak things like legends, axis labels, chart titles, number of columns in the datatable to display, single versus multi select filters. To take it a step further, you could add another trace to a chart if needed, change traces from grouped to stacked bar charts for example, or add cross filtering with row selection in the grid.
Step 3: Final Polish and Theming
The final step involves refining the aesthetic and overall theme. A theme can be applied with specific styling prompts. Be specific:
Apply a pastel color palette and a minimalist font. Darken the sidebar color, reduce overall padding, and add contextual colors to the data cards.
And with just one prompt we got a final Dash application with a unique theme. Once we are happy with the final result we can move on to deployment.
Closing the Loop: Deployment
Our agent has built out the Dash application, but moving it to a production environment requires infrastructure. We recommend using Plotly Cloud or Dash Enterprise to move from localhost to a shareable environment. We have an extension to the agents.md file available for your selected deployment route. When you are ready to deploy, you can simply ask your agent to do so, and it will follow the commands, allowing you to publish your application with one prompt and a few simple authentication steps.
Conclusion
By integrating AI coding agents into your Dash workflow, you can accelerate the path from concept to deployment. By setting clear standards in your agents.md file and using the Dash documentation via MCP, you can simplify your development process and focus your energy on creating high-value and beautiful interactive data applications.